
Quickstart
Build your first agent, space, thread, task, and flow — six hands-on walkthroughs on one page.
Every walkthrough on this page creates something — an agent, knowledge, a space, a thread, a task, a flow — and what you are able to create depends on your organization's plan, the role permissions you have been granted, and the permissions set on the individual resources you work with. If an option described here is not available to you, that is usually why; ask an administrator in your organization. The access model is documented in one place: Access & Permissions.
Six walkthroughs, one page. Each one ends in a single working result you can point at: an agent that exists, a file both people and agents can use, a space where work happens, a live conversation, a task that runs without you, and a process that runs itself from start to finish.
Work through them in order. Walkthrough by walkthrough you assemble the same setup real teams use — you build the worker, give it something to work from, put both in a shared place, and then get work done there in the three ways Opal supports. Nothing here tries to cover everything a feature can do; each walkthrough ends by naming the page that does, once you want the depth.
If a word is unfamiliar as you go, look it up in the Glossary.
Your First Agent
Agents are Opal's digital workers. You will build one, and it will be genuinely useful precisely because it is not general-purpose: an agent packages a role, a model, and a specific set of capabilities into one worker, so it applies the right context every time instead of being re-briefed for every request.
Outcomes
- An agent that exists in your organization, configured and ready to be put to work.
- A prompt that defines its role, a model that powers its reasoning, and only the capabilities its job actually calls for.
- Optional safeguards on what goes into the agent and what comes out of it.
Time Estimate
One short sitting. Deciding what the agent is for takes longer than configuring it.
Prerequisites
- An Opal account with permission to create agents.
- One clear job for the agent — for example, assessing account health before renewal conversations, or answering questions about your onboarding procedures.
- Optional: an agent template to start from, or a model config prepared by a colleague.
Steps
- Decide the one job this agent will do, and keep the scope narrow. A specialized agent behaves consistently because its prompt, model, knowledge, skills, tools, connectors, and guardrails are set up for that job — and because each agent is specialized, several can later contribute to the same piece of work, including one reviewing another's output.
- Start a new agent. You can build it from scratch, or start from an agent template — a pre-configured starting point that already carries a prompt, model, and capabilities someone has proven works.
- Write the prompt: what the agent's role is and how it should behave. This is the agent's job description, written in plain language.
- Select the model that powers its reasoning. You can choose a model and set its parameter values yourself, or select a model config — a saved preset that pairs a model with parameter values already defined. In the models catalog you can filter by provider and by the input and output modalities a model supports (text, image, audio, video, and file), and see each model's token costs in Opal credits before you commit. If your administrator has disabled a model for the organization, it will not be available to choose.
- Add the capabilities the job needs, and nothing more: skills for packaged know-how the agent applies when the work calls for it, connectors for systems Opal integrates with through the Model Context Protocol, tools for individual actions the agent can call, and widgets for interactive elements it can present in a thread. You can also add capabilities at the space level later, where every agent shares them, so there is no need to load everything onto this one agent.
- Attach any guardrails the work calls for, as input guardrails, output guardrails, or both, and choose how each one handles flagged content — for example redacting, hashing, masking, or blocking it.
- Save the agent. It now exists in your organization, but it is not working yet: an agent starts working when you add it into a space, which is the third walkthrough below.
Role, responsibilities, standing instructions
A model from the catalog, or a saved config
Skills, connectors, tools, widgets
On the input side, the output side, or both
Same context, same rules — every run.
Next Steps
- Next, give your agent something to work from: Your First Knowledge, below.
- For the full picture of how agents are configured and everything they can be assigned to do, read Agents.
Your First Knowledge
An agent with no grounding can only give you generic answers. Knowledge is where your organization's own material lives — one place that both people and agents work from, so there is no second, drifting copy kept for the AI.
Outcomes
- A folder in Knowledge holding at least one file, organized the way your team already thinks about the content.
- That file processed into a usable form, checked, and published — so anyone and anything using it is working from a reviewed version.
Time Estimate
One short sitting per file, plus whatever time Opal needs to process a large upload.
Prerequisites
- An Opal account with permission to add content to Knowledge.
- Something your work genuinely depends on: a procedure, a policy, a reference sheet, a set of notes, a recording. Supported document formats include PDF, DOCX, XLSX, PPTX, CSV, and MD, and uploaded files are also detected as images, audio, or video.
Steps
- Create a folder for the material. Knowledge is a familiar system of files and folders, so name and nest it the way your team already talks about the content.
- Add your content to the folder: upload files from your device, or author a new document directly in Opal.
- Review the processing Opal offers for what you added. Opal detects the file type and suggests handling that fits it — digitizing a scanned PDF into markdown, transcribing audio or video with speaker diarization, annotating an image or video, or extracting an embedded artifact into its own file. This is the step that turns a file into something an agent can actually use.
- Open the file and read it through. Each file opens in an interface suited to its format, so you can check the result and fix anything that needs correcting.
- Publish the version you have checked. Knowledge uses a draft-to-published workflow alongside version history and permissions, so people and agents draw on reviewed content rather than whatever was uploaded most recently.
- Optional: group related files and folders into a library when you want to bring content together for a particular purpose.
One thing you do not have to do: prepare different copies of a file for different agents. When an agent retrieves a file, Opal passes it natively if that agent's model supports the format, and supplies a text equivalent — such as the transcription of a recording — when it does not.
& processingOCR → markdown
Searchable, retrievable, editable in place.
Published when you are ready.
Next Steps
- Next, bring your agent and your knowledge together in one place: Your First Space, below.
- For the full picture of how Knowledge is organized, processed, and governed, read Knowledge Overview.
Your First Space
A space is where work actually happens. It is the operational environment that holds the people, agents, knowledge, and capabilities of one team, project, or initiative — so nobody has to reassemble that context from scattered tools every time.
Outcomes
- A space holding the agent from Your First Agent and the knowledge from Your First Knowledge.
- Shared capabilities configured once at the space level rather than repeatedly on each agent.
- The right people invited, each at the permission level their role calls for.
- A place where threads, tasks, and flows can now be run.
Time Estimate
One short sitting, once the agent and knowledge from the previous two walkthroughs exist.
Prerequisites
- The agent from Your First Agent and the knowledge folder from Your First Knowledge.
- One unit of work for the space to be organized around: a department, project, initiative, customer, or product.
- The names of the colleagues who need to take part.
Steps
- Create the space and name it after the one thing it is for. A space works best when its scope matches how the team actually works.
- Add your agent into the space. This is the move that puts it to work: from here it can collaborate in the space's threads and be assigned to execute or review its tasks and flow steps.
- Add the knowledge folder you created, so every person and every agent in the space works from the same information.
- Add the capabilities the whole team relies on — skills, connectors, tools, widgets, and guardrails — at the space level. Anything added here is available to every agent and every piece of work in the space, so a capability, integration, or safeguard is set up once instead of being repeated on each agent.
- Invite the people who need to take part and give each one a permission level: Manage to view, edit, and use the space as well as manage its settings and sharing; Access to view, edit, and use it; View to see its details.
Next Steps
- Your space is ready to work in. The next three walkthroughs cover the three ways that happens: live in a thread, on its own in a task, and step by step in a flow.
- For the full picture of what a space holds and how its permission levels work, read Spaces.
Your First Thread
The fastest way to feel what Opal does is to talk to your agent. A thread is a conversation inside a space where people and agents work together in real time — you direct the work as it unfolds and adjust course as you go.
Outcomes
- A thread in your space where you and your agent worked something out together.
- A first agent response, grounded in the space's knowledge and the agent's own capabilities.
- A conversation your colleagues can join rather than duplicate.
Time Estimate
As long as the conversation takes. Setting the thread up is two steps.
Prerequisites
- The space from Your First Space, with your agent in it.
- Something you would talk through with a colleague rather than hand over — a question, a draft, a decision to think out loud about.
Steps
- Create a thread in your space.
- Add the participants: your agent, and any colleagues who should take part. Taking part in a thread comes from being added to it, not from being tagged in it.
- Write your request in plain language, the same way you would ask a colleague.
- Tag your agent with
@in the message to invoke a response. - Read what comes back. The agent answers using the knowledge available in the space along with its own capabilities — its skills, connectors, tools, widgets, and guardrails.
- Keep going: ask follow-up questions, redirect, and refine the output as the conversation develops. This is the point of a thread — you are steering, not specifying everything up front.
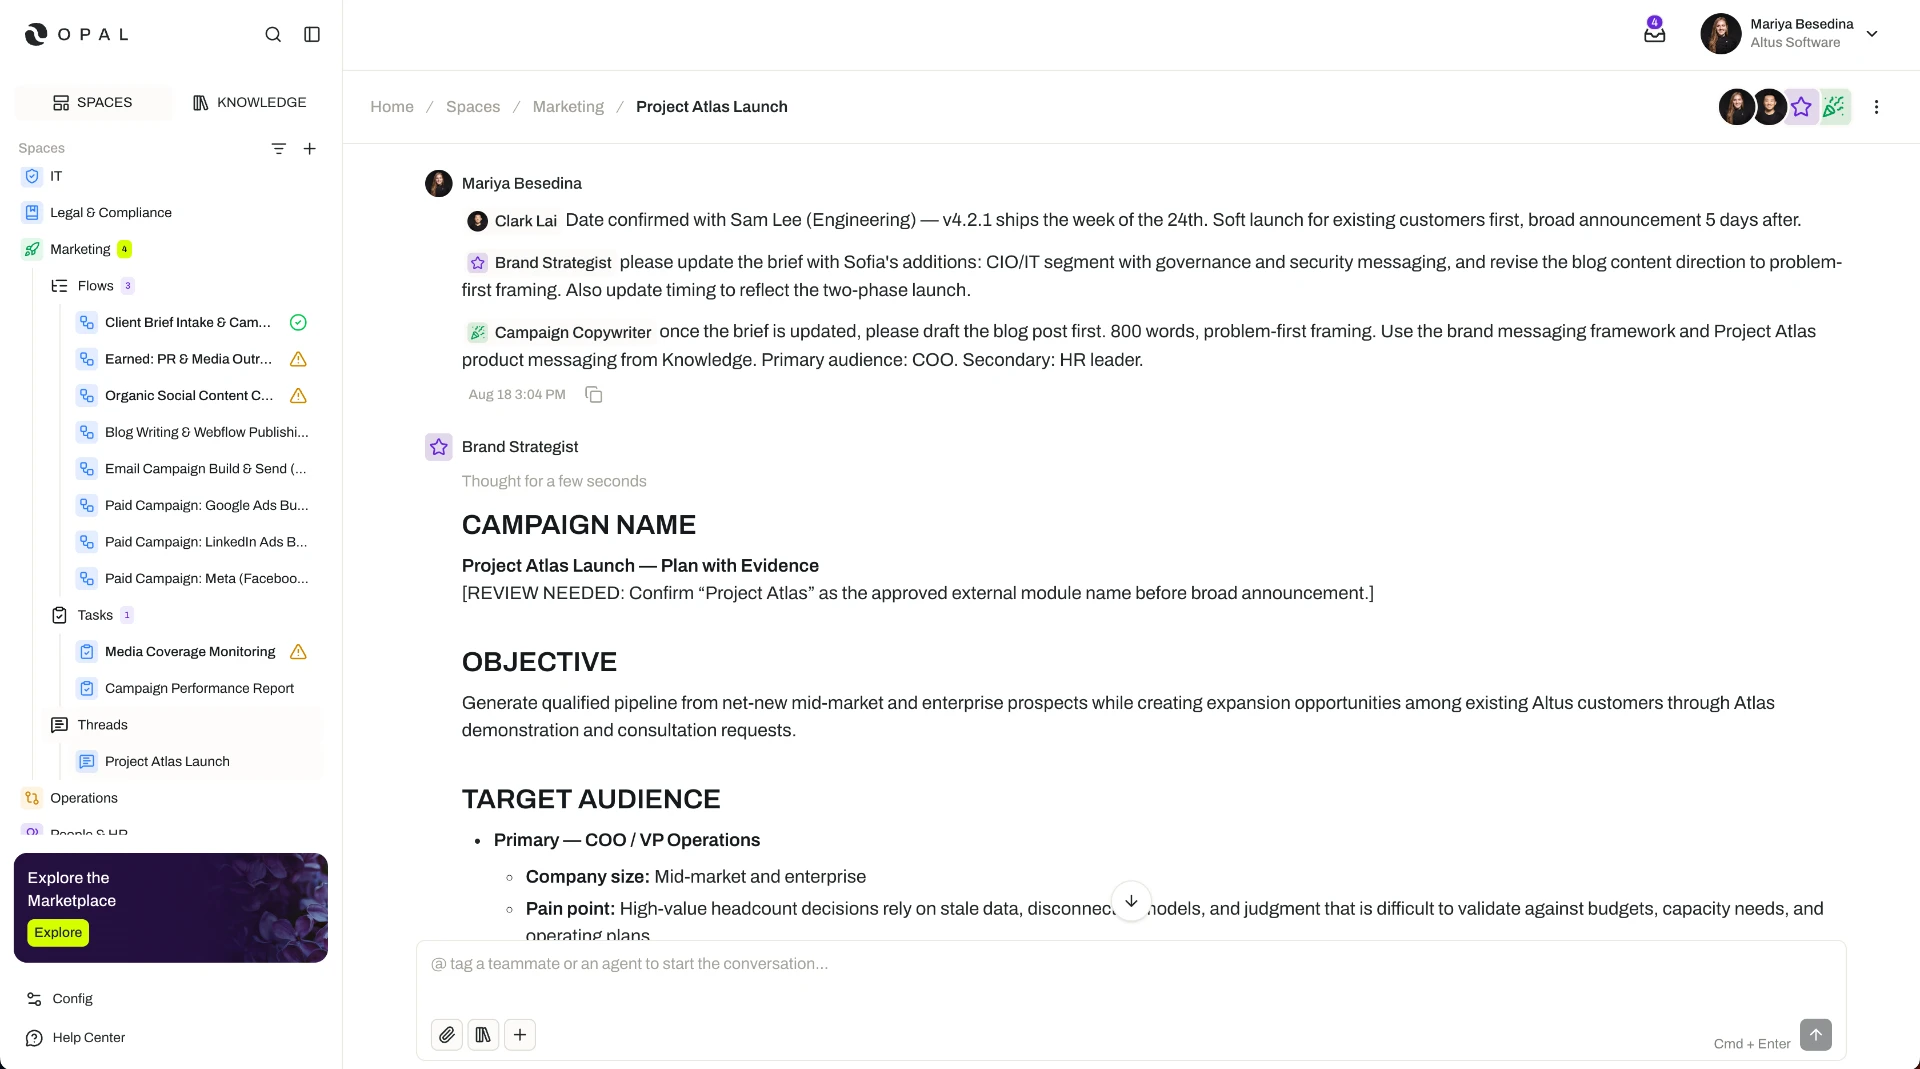
- When you want more than one perspective, tag several agents in a single message. They respond in the order you tagged them, so you control the sequence — tagging a research agent first and a copywriter agent second means the copy is written on top of the research.
- To bring a colleague in, tag them with
@. They are notified and join the same conversation, so everyone works from one shared thread and the same set of agent responses instead of running separate conversations.
Next Steps
- Next, move from work you direct live to work that runs without you: Your First Task, below.
- For the full picture of participants, tagging, and multi-agent conversations, read Threads.
Your First Task
Some work does not need a conversation — it needs to happen reliably, on time, every time. A task is a unit of work an agent runs on its own, with its own instructions, its own trigger, and review if you want it.
Outcomes
- A task assigned to your agent that runs without you sitting in a conversation.
- A trigger that decides when it runs, and review in place if you want a person or another agent to check the output.
- A Run Log entry you can open to see exactly what happened.
Time Estimate
One short sitting to set up. After that it runs without you.
Prerequisites
- The space from Your First Space, with your agent in it.
- One piece of repeatable work — something that needs doing on a cadence, or whenever something happens in another system.
Steps
- Choose the work. A task is a single unit of work, so pick one thing the agent can carry out end to end — for example, reviewing the latest campaign performance and flagging any metric outside its target range.
- Create the task in your space and assign it to your agent.
- Write the execution instructions: what the agent should do each time the task runs.
- Add review if you want it. A task can have an agent reviewer and a user reviewer, each with their own review instructions. For your first task, add yourself as the user reviewer so you see the output before the work is treated as complete.
- Choose how the task is triggered:
- Manual — you run it yourself, on demand.
- Recurring — it runs on a repeating cadence, such as every 15 minutes, daily, or weekly.
- Schedule — it runs at a specific date and time, or after a relative amount of time such as in four hours.
- Webhook — it runs in response to an external event. Opal generates a webhook endpoint, secured with a secret token, that another system calls to run it.
- Optional: attach extra resources to the task. It can already use the knowledge in its space and the resources on its assigned agent, so only add knowledge, skills, connectors, tools, or guardrails if this particular task needs something more.
- Optional: turn on Request Input so the agent can pause and ask you for information it needs mid-run, and Continuous Learning so lessons from each successful run are captured and sharpen later runs.
- Run it. If you chose a manual trigger, run it now; otherwise wait for its first triggered run.
- Open the Run Log to see the run recorded, and review the output if you added yourself as a reviewer.
Whenever someone starts it
Ad-hoc work you want repeatable
At a specific date and time
A one-off run booked in advance
On a cadence — daily, weekly, monthly
Standing reports and routine checks
When an external system calls in
Work triggered by another system's event
Next Steps
- Next, move from a single unit of work to a whole process: Your First Flow, below.
- For the full picture of triggers, reviewers, attached resources, and Run Logs, read Tasks.
Your First Flow
A flow is the biggest step up on this page: a multi-step process, each step assigned to an agent or a person, with review where it matters. Think of it as a standard operating procedure that actually runs — and that keeps working when requirements change mid-project.
Outcomes
- A flow of a few sequential steps that carried a small process from start to finish.
- Each step assigned to an agent or a person, with review where it counts.
- A Run Log covering every action taken across the flow and each of its steps.
Time Estimate
The longest of the six. Sketching the steps takes most of the effort; the run then proceeds one step at a time, pausing whenever it needs a person.
Prerequisites
- The space from Your First Space, with your agent in it.
- A small process with a clear beginning and end — for example, gather information, draft something from it, have a person sign it off.
- The people who take part in that process.
Steps
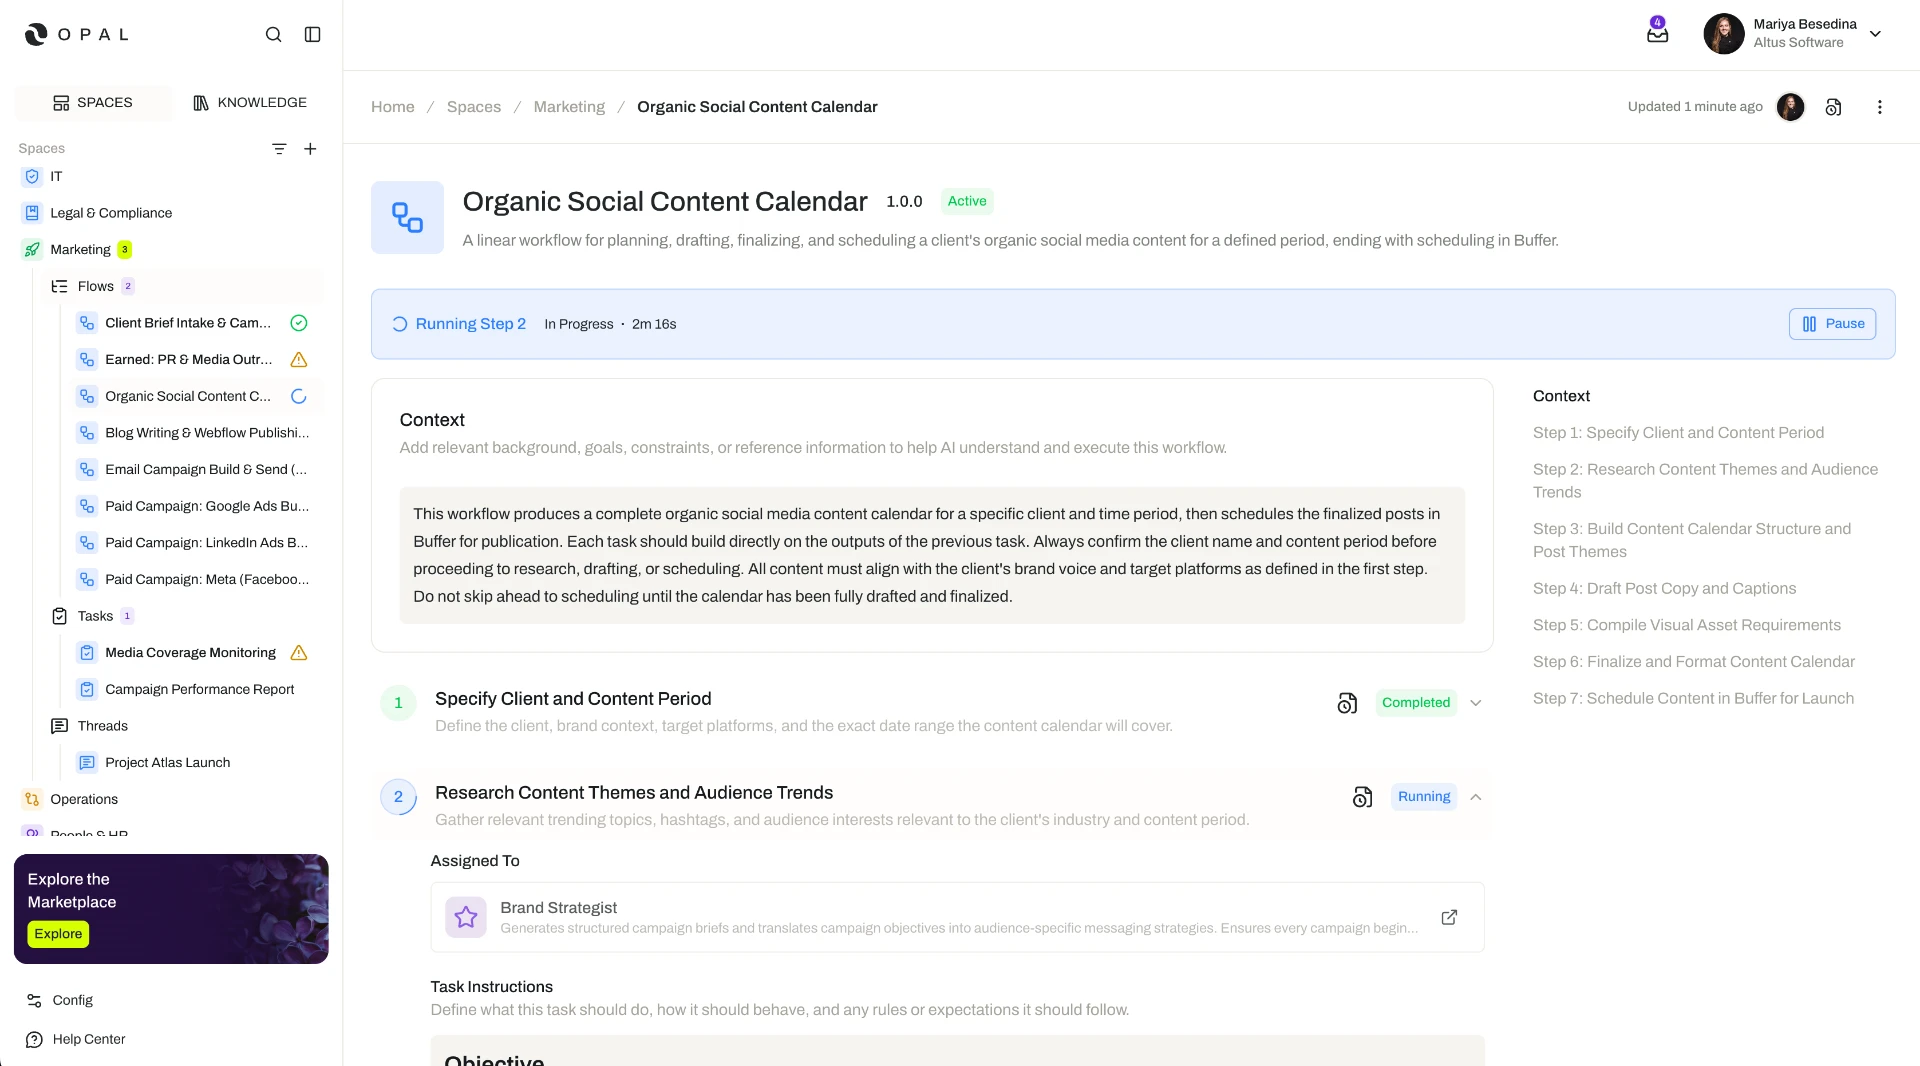
- Write the process down as an ordered list of steps. Flows execute sequentially, one step at a time, so the order you write is the order it runs.
- Create the flow in your space and fill in its flow-level context: the overarching goals, requirements, and purpose. Every step runs with this shared understanding of the objective.
- Add the first step: a name, an optional description, an assignee — an agent or a person — and instructions for completing the work.
- Add the remaining steps the same way, in order.
- Add review where it matters. Any step can have an agent reviewer and a user reviewer, each with their own review instructions. A common pattern is one agent executing a step, another agent reviewing it, and a person signing off at the end.
- Optional, per step: attach extra knowledge, skills, connectors, tools, or guardrails if that step needs more than the space and its agents already provide; turn on Request Input so an agent can pause to ask for information; turn on Allow Dynamic Step Creation so a step can add further steps during the run when the work calls for it. Steps added this way are added linearly — flows never run steps in parallel.
- Optional: turn on Continuous Learning, so observations and lessons from each successful run are compiled into a Continuous Learning document you can read and edit.
- Start a run, adding any context specific to this run — so the same flow adapts to the circumstances of each one.
- Respond when the flow needs you. You are notified when a step needs your input or your review; reviewing a step means approving it, with optional comments, or requesting changes with written feedback.
- If the requirements change mid-run, do not rebuild the flow. Reset the run and re-run it with the new requirements as additional context: Opal reviews the work already done at each step and determines whether a step needs to be redone or can be skipped.
- Open the Run Log to see every action taken across the flow and its steps.
Next Steps
- You have now done everything the Quickstart covers: an agent, knowledge, a space, and work running in all three ways. Next, see how these pieces combine to accomplish a full real-world scenario in Guides.
- For the full picture of steps, reviewers, run context, resets, and Continuous Learning, read Flows.